Please note this post may contain affiliate links picked by me (Jay) that I have deemed may be of interest or relevant to you the reader of this.
These links do not affect the cost of the thing if you decide to purchase but i may get a little money if you choose to purchase.
For more information on my affiliate link policy click here.
Like a painter with a brush dipped in sunlight, capturing the perfect photo bathed in natural light can transform an ordinary moment into something extraordinary. As a photographer, I've learned that harnessing the power of the sun can elevate my images to new heights.
From understanding the subtle nuances of light to utilizing tools that enhance its beauty, there are six essential tips that can take your photos from average to awe-inspiring.
So, if you're ready to unlock the secrets of natural sunlight and create stunning visuals that will leave viewers captivated, join me on this journey as we explore the art of harnessing the sun's radiant glow.
Key Takeaways
- Natural light enhances colors and adds depth to photos.
- The best time of day to shoot is during the Golden Hour, shortly after sunrise and before sunset.
- Position yourself strategically to take advantage of the angle and direction of sunlight.
- Reflectors and diffusers are useful tools for manipulating and enhancing natural light.
Understanding the Importance of Natural Light
Understanding the importance of natural light is crucial when it comes to capturing stunning photos that truly come to life. As a photographer, I've discovered the incredible benefits of shooting in natural light and using it to create depth in my photos. Natural light has a unique quality that artificial lighting simply can't replicate. It's soft, diffused, and adds a beautiful touch to any image.
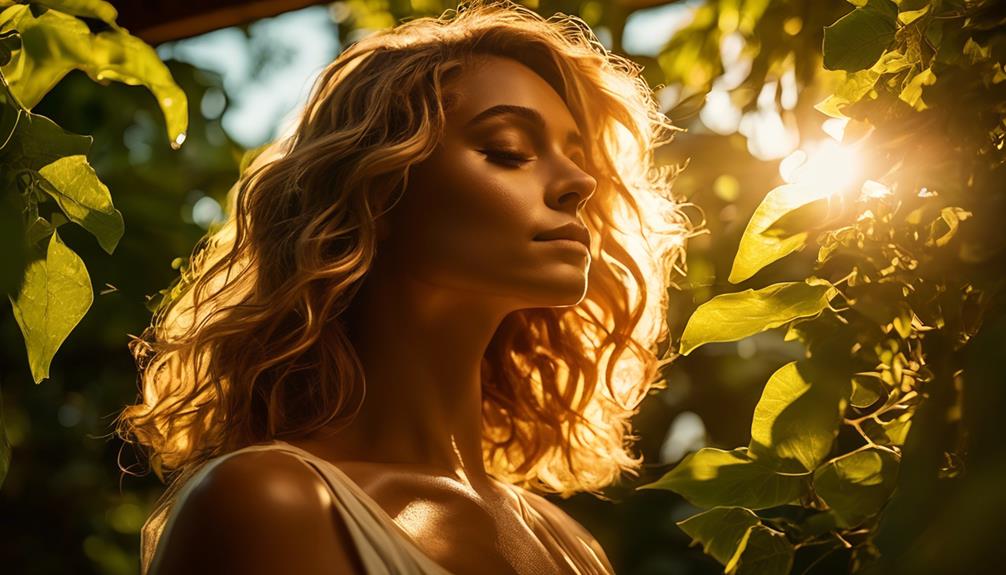
One of the main benefits of shooting in natural light is the way it enhances the colors in a photo. The warm tones of the sun can create a sense of warmth and depth, making the subject come alive. When shooting portraits, for example, natural light can bring out the natural beauty of the subject's skin tone and make their eyes sparkle.
In addition to enhancing colors, natural light also creates interesting shadows and highlights, which can add depth and dimension to your photos. By positioning your subject in relation to the light source, you can create dramatic effects that draw the viewer's attention and create a sense of depth. Experiment with different angles and compositions to see how the light interacts with your subject and the surrounding environment.
To make the most of natural light, it's important to understand its characteristics and how it changes throughout the day. The early morning and late afternoon are often referred to as the 'golden hour' because the light is softer and warmer, casting a beautiful glow on your subjects. Avoid shooting during midday when the light is harsh and creates unflattering shadows.
Finding the Best Time of Day to Shoot
When it comes to capturing the best photos using natural sunlight, finding the ideal time of day to shoot is essential. The lighting conditions at different times of the day can greatly impact the outcome of your photographs. So, let's dive into finding the best time of day to shoot and how it can enhance your photography.
To help you understand the different lighting conditions throughout the day, I've created a table below:
| Time of Day | Lighting Conditions |
|---|---|
| Golden Hour | Soft, warm, and flattering light |
| Midday | Harsh, direct light |
| Sunset | Warm and dramatic light |
The best time to shoot is during the Golden Hour, which occurs shortly after sunrise and before sunset. During this time, the sun is low on the horizon, creating a soft, warm, and flattering light. The colors are more vibrant, and the shadows are longer, adding depth and dimension to your photos. It's the perfect time to capture landscapes, portraits, or any subject you want to highlight.
However, if you can't shoot during the Golden Hour, there are still ways to make the most of other times of the day. Midday, when the sun is directly overhead, can be challenging due to the harsh, contrasty light. To overcome this, you can experiment with different angles, use a reflector to bounce light onto your subject, or seek out shaded areas to soften the light.
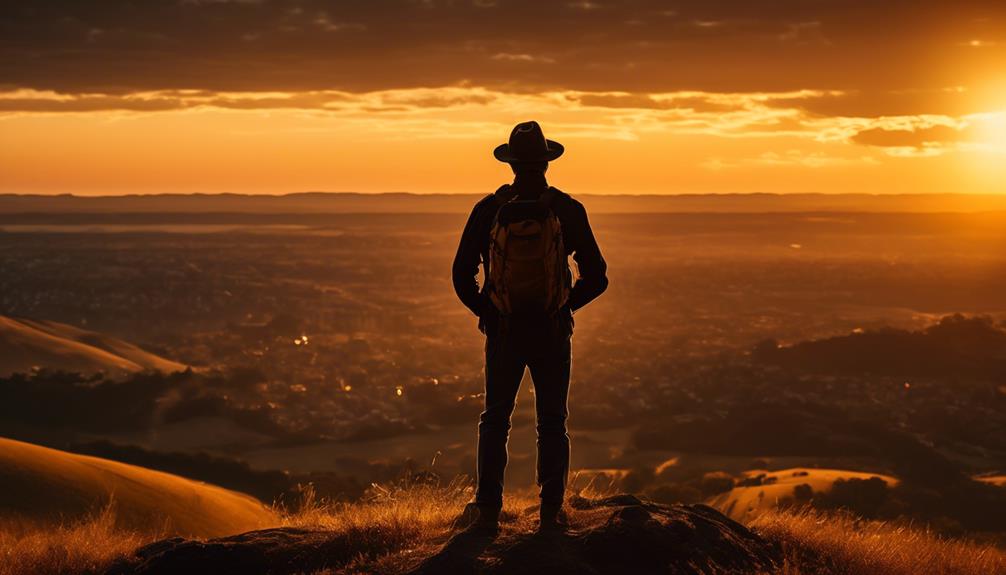
Sunset is another fantastic time to shoot, as the warm and dramatic light can create stunning images. The sky often takes on a range of beautiful colors, providing a captivating backdrop for your photographs. It's a great time to capture silhouettes, cityscapes, or any scene that benefits from a touch of magic.
Positioning Yourself for the Perfect Lighting
To capture the perfect lighting in your photos, positioning yourself strategically is key. Mastering composition and capturing the right mood requires careful consideration of where you stand in relation to the sun. As a photographer, I've learned that the angle, direction, and intensity of natural sunlight can dramatically enhance or diminish the quality of a photograph.
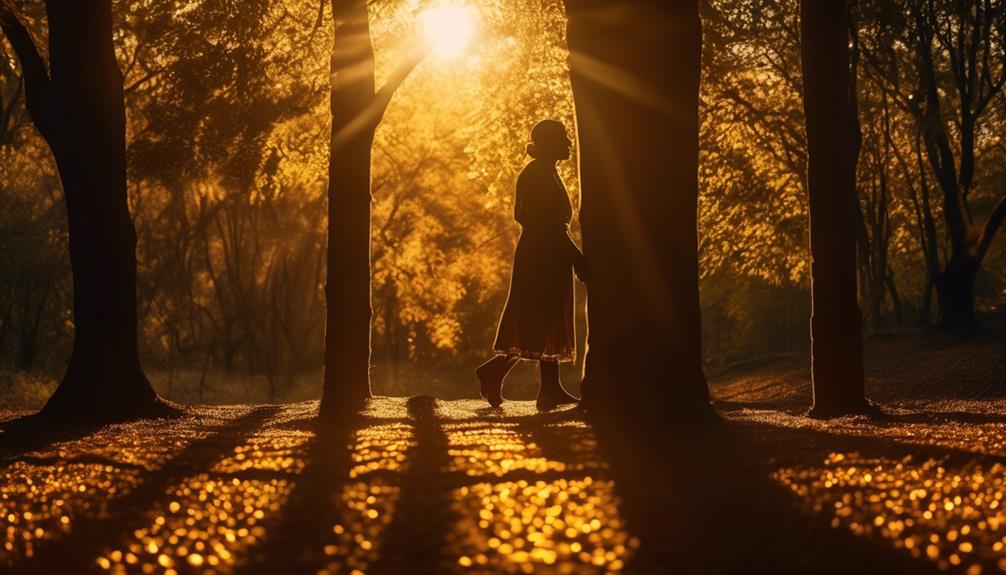
When positioning yourself, it's important to understand how light interacts with the subject. Consider the shadows and highlights that will be cast upon your subject and adjust your position accordingly. For example, if you want to create a soft and ethereal atmosphere, positioning yourself with the sun behind your subject can create a beautiful backlighting effect. On the other hand, if you want to highlight texture and create dramatic contrasts, positioning yourself with the sun at your back can achieve this effect.
Additionally, take into account the time of day and the position of the sun in the sky. During the golden hour, which occurs shortly after sunrise or before sunset, the sunlight is softer and more diffused, creating a warm and inviting glow. This is an ideal time to capture portraits or landscapes as the lighting is more flattering and enhances the mood of the scene.
Experiment with different angles and perspectives to find the perfect lighting for your desired composition. Move around your subject, crouch down, or climb up to gain a fresh perspective and discover unique lighting opportunities. Don't be afraid to break the rules and try unconventional positions to create innovative and captivating photographs.
Using Reflectors and Diffusers to Enhance Light
Reflectors and diffusers are essential tools for photographers looking to enhance the natural light in their photos. These creative lighting techniques allow us to manipulate light and create stunning effects in our images. Reflectors bounce light back onto the subject, while diffusers soften harsh light and create a more even and flattering illumination.
One of my favorite ways to use reflectors is to create beautiful catchlights in the eyes of my subjects. By positioning a reflector just below the face, I can bounce the sunlight back up and create a natural, sparkling highlight in the eyes. This adds depth and dimension to the portrait, making the eyes come alive.
Another technique I love is using a diffuser to soften the light and eliminate harsh shadows. This is especially useful when photographing people or objects outdoors on a sunny day. By placing the diffuser between the subject and the sun, it diffuses the light, creating a soft and even illumination. This helps to reduce the contrast and create a more flattering and natural-looking image.
While professional reflectors and diffusers can be quite expensive, there are DIY alternatives that work just as well. For reflectors, you can use things like white foam boards, aluminum foil, or even a white bedsheet. These surfaces reflect light in a similar way to a professional reflector, allowing you to bounce light onto your subject.
As for diffusers, you can use a sheer curtain, a shower curtain, or even a white umbrella to soften and scatter the light.
Avoiding Harsh Shadows and Overexposure
Using proper techniques to avoid harsh shadows and overexposure is crucial for capturing high-quality photos in natural sunlight. Here are some tips to help you prevent underexposure and achieve balanced lighting:
- Find the Right Time: Shooting during the golden hour, the period shortly after sunrise or before sunset, can provide soft, warm light that minimizes harsh shadows and reduces the risk of overexposure.
- Use a Reflector: Reflectors are handy tools that bounce sunlight back onto your subject, filling in shadows and creating a more even and flattering light. Experiment with different reflector colors to achieve the desired effect.
- Employ the Fill Flash Technique: When faced with strong backlighting or deep shadows, using fill flash can help balance the exposure. By adding a burst of light, you can illuminate your subject while still preserving the natural feel of the scene.
- Adjust Your Camera Settings: Take control of your camera's exposure settings to avoid overexposure and underexposure. Use the histogram to monitor the distribution of light and adjust your aperture, shutter speed, and ISO accordingly.
Embracing the Golden Hour for Magical Photos
During the magical golden hour, the soft, warm light of the rising or setting sun creates an enchanting atmosphere that can transform your photos into captivating works of art. This is the perfect time to capture warm tones and utilize backlighting to add a touch of magic to your images.
As the sun hovers low on the horizon, its light becomes diffused, casting a warm and golden glow over everything it touches. This soft, diffused light is ideal for photography, as it eliminates harsh shadows and gives your subjects a warm, flattering appearance. The warm tones created during the golden hour add a sense of depth and emotion to your photos, making them more visually appealing and memorable.
One of the key techniques to embrace during the golden hour is utilizing backlighting. Positioning your subject between you and the light source allows the sun's rays to shine through, creating a beautiful halo effect and adding a dreamy, ethereal quality to your photos. This technique works particularly well for portraits, as it highlights the subject and creates a stunning contrast against the warm, glowing background.
To make the most of the golden hour, be prepared and plan your shoot in advance. Check the weather forecast to determine the exact timing of sunrise or sunset, and arrive early to scout the location. Experiment with different angles and compositions, and don't be afraid to get creative. Use the warm tones and backlighting to your advantage, and let the magic of the golden hour transform your photos into truly extraordinary works of art.
Frequently Asked Questions
What Type of Camera Should I Use to Capture Photos Using Natural Sunlight?
To capture stunning photos using natural sunlight, the type of camera you use is important. Consider a camera with manual settings, like a DSLR or mirrorless camera, as this allows you to have more control over exposure. Experiment with different camera settings to find the best ones for capturing natural sunlight.
Additionally, finding the perfect location for natural sunlight photography is crucial. Look for open spaces with soft, diffused light and interesting backgrounds to enhance your photos.
Are There Any Specific Techniques to Capture Stunning Silhouettes Using Natural Sunlight?
To capture stunning silhouettes using natural sunlight, there are a few techniques that can make your photos stand out.
One of the best times to shoot silhouette photography is during sunset, when the sky is ablaze with vibrant colors. Position your subject against the bright background and expose for the sky, allowing the subject to fall into shadow.
Play with different angles and shapes to create visually striking images. Experimentation is key, so don't be afraid to get creative and push the boundaries of traditional photography.
How Can I Ensure That My Subject's Face Is Well-Lit and Not in Shadow When Shooting Outdoors?
To ensure my subject's face is well-lit and not in shadow when shooting outdoors, I've discovered some helpful tips.
Firstly, I avoid harsh shadows by positioning my subject in areas where the sunlight is softer, such as under a tree or near a building.
Secondly, I use reflectors to bounce light onto their face, creating a more balanced and flattering look.
These techniques have truly transformed my outdoor photography, resulting in stunning and beautifully lit portraits.
Are There Any Tips for Photographing Moving Subjects, Such as Wildlife or Sports, Using Natural Sunlight?
When it comes to photographing moving subjects like wildlife or sports using natural sunlight, there are a few tips that can help you freeze the action and capture the motion effectively.
Firstly, make sure you have a fast shutter speed to avoid blur.
Secondly, position yourself in a way that allows the sunlight to illuminate your subject from a flattering angle.
Lastly, consider using burst mode to capture a series of shots in quick succession.
These techniques will help you capture dynamic moments with natural sunlight.
Can You Provide Guidance on How to Edit and Enhance Photos Taken With Natural Sunlight to Make Them Even More Captivating?
Sure, I can provide guidance on how to edit and enhance photos taken with natural sunlight to make them even more captivating.
Enhancing natural sunlight photos with editing software can help bring out the vibrant colors and details, giving your images that extra pop.
Additionally, using natural sunlight to create dramatic portrait shots is all about finding the right angles and playing with the shadows.
Conclusion
In conclusion, capturing stunning photos with natural sunlight is all about understanding its importance and harnessing its magic. By finding the best time of day, positioning yourself strategically, and using reflectors and diffusers, you can enhance the lighting in your photos.
Avoiding harsh shadows and overexposure will ensure a balanced and captivating image. And don't forget to embrace the golden hour, when the sun's warm glow can add a touch of enchantment to your photos.
Remember, with the right technique, natural sunlight can truly bring your photos to life. So go out there and let the sun work its wonders!